Ingress.Guide
Esta página aún no está disponible en tu idioma.
What is Ingress?
Section titled “What is Ingress?”Ingress is a global location-based game featuring two factions fighting for control.
The game offers differing play styles from the casual to hardcore players to strategic players and everything in between!
The in-game map features items called Portals, which represent a Point of Interest in the real-world, such as a statue, historical monument, building, local park, etc.
Portals are used to connect points on the map, when three are connected together they create what’s known as Field and help your team win.
Ingress has grown beyond just a game and is often used as a tool by players to explore and discover different areas.
Factions
Section titled “Factions”The initial step a player takes to begin playing Ingress is to choose a Faction to align themselves with, either the Enlightened or the Resistance.
The game is exactly the same for both Factions, but which side you choose defines who you will be playing with, and who against.
Enlightened (ENL)
Section titled “Enlightened (ENL)”The Enlightened seek to harness the power of Exotic Matter (XM) to evolve mankind to reach a new state of being through its mind-enhancing properties.
Resistance (RES)
Section titled “Resistance (RES)”The Resistance treat Exotic Matter with caution and battle those that use Exotic Matter to enslave humanity.
Scanner Overview
Section titled “Scanner Overview”Game Map
Section titled “Game Map”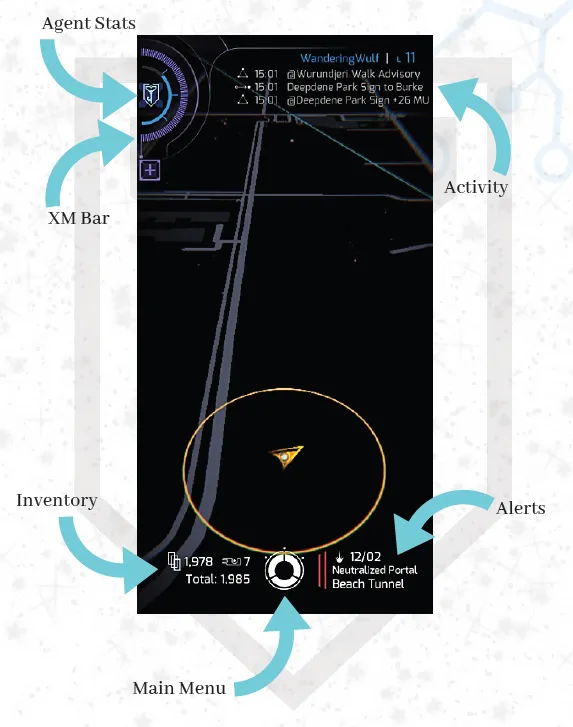
- Map: The in-game map shows major roads and rivers to help you orientate yourself between
- Agent Avatar: Your avatar represents your current location, which is only visible to you
- Action Range: You can interact with Portals and dropped items within 40m range, inside the circle
- Portal: Portals are points of interest where XM ingresses or enters our world. Resistance Portals are blue, Enlightened Portals are green, Machina Portals are red, and neutral Portals are grey
- Control Field: Fields are created when three Portals are linked together to form a triangle. The Resistance and Enlightened battle for Mind Units (MU) by creating Fields
- XM Bar: Shows your current XM storage, energy needed to perform in-game actions. The [+] icon allows you to top-up the bar.
- AP Bar: Shows your Action Point (AP) progress to the next level. AP acts like your experience points.
- Main menu: Tap to open the Main menu. Long-press to access Inventory, Attack, and COMM
- Inventory: Displays your current number of items held and the Portal Keys usable.
- Alerts: Displays the most recent notification or action. Tapping this will go into the Alerts menu.
- Dispatch: Allows you to see current daily tasks and special event tasks.
- Compass: Points to the north, or can be tapped to change your view automatically.
- Layers: Tap to enable, invert, or disable viewing visited, captured, Scout Controlled Portals, Drones, and Portals that you have accessible Portal Keys for.
- Agent name: Tap to view your game profile.
Exotic Matter
Section titled “Exotic Matter”A resource collected by the Scanner and drained with most actions made with the Scanner
Profile
Section titled “Profile”Here you can view your badges (in-game achievements and collectables), as well as see your AP progress, level-up requirements,
- Name: Your in-game username
- Flair: Automatically shown next to your name if you are a CORE Subscriber or have Recursed
- Level: Displays your in-game level
- AP Bar: Shows your current progress towards the next level
- AP progression: Shows your AP in numbers
- Avatar: Your in-game avatar, which can be customised by tapping on the arrow next to it.
- Level requirements: Shows what badges you need for the next level and how many have been achieved so far.
- Recursion AP: Displays your current AP after a Recursion
- All Time AP: Shows your total AP earned
- Niantic Profile: View your Niantic Profile
- Share: Creates a URL for other players to see your profile
- Copy: Copy all stats
Main menu
Section titled “Main menu”- Missions: View nearby Missions
- Dronenet: Perform actions using your Drone
- Dispatch: Complete daily and global tasks
- Scores: View the local scoreboard to see how many Mind Units have been captured
- Store: Purchase items to add to your inventory or profile.
- Attack: A carousel giving quick access to XMP Bursters, Cubes and Virus’s
- Inventory: View your owned items in categories and sorted by level
- COMM: Open the Activity Menu
Activity menu
Section titled “Activity menu”- Activities: See actions taken by all users in a specified range.
- Alerts: See all notifications when portals you own have been attacked, neutralised or had been interacted with Beacons.
- Chat: Talk to fellow agents of your same team or all agents across both teams. See Chat for more information.
- News: View updates from Niantic about noteworthy information on Ingress. Ranging from announcements of events, progress on global events and even details on in-game updates.
Your Objectives
Section titled “Your Objectives”As an Ingress Agent, your mission is to choose a side and connect with your Faction, then complete the following objectives:
- Hack Portals to collect resources
- Capture neutral Portals by deploying Resonators
- Link two friendly Portals together
- Field by linking three friendly Portals to capture Mind Units (MU)
Movement
Section titled “Movement”Ingress is an augmented reality game requiring you to explore and experience the real world in order to interact with the game.
To move in Ingress, you need to move in the real world. For example, you can walk, cycle, or use an assistive mobility device to collect XM and interact with Portals within 40m range.
There are three main ways to play the game:
Walkgress
Section titled “Walkgress”Ingress can be a fantastic motivator to getting out and going walkabout. Advocating you to explore areas, parks, trails, laneways that you otherwise would never have experienced!
Going the extra mile means the opposition also need to go an extra mile to match your effort. Going off the beaten path means Portals you own are likely to last longer!
Bikegress
Section titled “Bikegress”Playing Ingress while riding a bike is also a fantastic way to get fit and experience the world in an alternative way. It allows for fast gameplay in a way that is not possible by walking. Bikes also offer the ability to go off road while still maintaining speed.
Bikegressing is also extremely important to help your team during special Ingress events like Anomalies.
Cargress
Section titled “Cargress”The idea of walking kilometres to see one portal may intimidate you. With Ingress you don’t need to do this, Ingress can be played from the car, train, bike, tram, even a boat and a plane!
It is not encouraged to play while driving though! Ingress has an automatic speed-lock, stopping all actions if it identifies that you are moving over a certain speed. Pull over and remember safety first.
The Chat window allows you to communicate with players of your own FACTION or communicate with all players under CROSS-FACTION chat.
Most of the communication within your team will most likely happen on a separate app, but the in-game chat will be the first point of call to reach out to anybody.
Communities all over the world use different apps; Discord, Telegram, Slack, Wechat, the list is endless.
To find out what your locals use, ask in Faction Comms.
Tagging another agent in your message is VITALLY important in ensuring they get your message. To do this, tap their agent name, and select message. Alternatively, you can type in their agent name with a ’@’ in front of it. This will allow you to tag multiple agents at once.
Deciding which chat to post in is crucial. Posting in the Faction chat is a great way to contact your own team, you can ask for help, get recruited into your local faction chat or communicate on the fly.
If you post in Cross-faction chat, the opposing team will be able to see everything you post. “Lets farm at the post office tonight” posted in Cross-Faction will tell everyone that you are low on gear and they can come and Smash your farm, resulting in no gear for you or your fellow agents.
Be sure to keep conversations respectful and use age-appropriate language. Refer to the Niantic Player Guidelines for more information on protocol
Portals
Section titled “Portals”A portal is the Ingress equivalent to a Point of Interest in the real world. These can include:
- Church
- Lighthouse
- Mural
- Park Sign
- Post Office
- Statue
- Temple
- Trailmarker
There are certain criteria for an object or landmark to become a portal, so not everything will appear in Ingress!
Portal Colors
Section titled “Portal Colors”Portals can be one of four colors and are based on who captures the portal:
- Grey = Neutral portals, not owned by any faction. These are up for grabs!
- Blue = Portal captured by the Resistance faction
- Green = Portal captured by the Enlightened faction
- Red = Portal captured by Machina
See a Grey Portal? Capture it!
See a friendly Portal? Upgrade it!
See an opposing Portal? Smash it!
See a Red Portal? Smash it and capture it!
Portal Size
Section titled “Portal Size”There are small differences in the size of portals, the BIGGER the portal, the HIGHER the level.
As a new player you may not be able to take out the stronger portals right away, but you can always ask for help, or wait until you level up and get stronger yourself.
Portal Levels
Section titled “Portal Levels”The level of a portal is dictated by the level of its Resonators.
Portal levels range from 1 to 8.
A single agent can make a max portal of level 5, anything else requires multiple agents.
To get a level 8 portal, requires eight agents, level 8 and over.
Hacking
Section titled “Hacking”Accessing Portals, known as Portal Hacking, is the primary way to get resources.
Portals allow an agent to hack every 5 minutes, to a max of 4 hacks every 4 hours.
To do almost any action in Ingress, you need to have specific Items:
- Resonators
- Weapons
- Mods
- Powercubes
These are acquired from hacking portals.
There are different ways to hack every portal.
When you are on top of a portal the hack icon will become clickable. Tapping on this button will allow you to hack the portal. If you hold down the Hack button you get three options:
- Glyph hacking
- Key Hacking
- No-Key Hacking
Hacking and Portal Levels
Section titled “Hacking and Portal Levels”While some items have a ‘rarity value’, others have a level value between one and eight.
The highest level of items you can hack is either your level +1 or the portal’s level +1 up until level 8.
A level 4 portal will give out a majority of Level 4 items, with a few items from level 3 or 5. If you hack a level 7 portal but you are only a level 3, you will still only get level 3-4 gear, as you level up you will need higher level portals to gain access to higher level items.
Glyph Hacking
Section titled “Glyph Hacking”Holding down the hack button on a portal will start a mini-game called Glyphing.
Glyphing is a game of memory where you need to memorise the glyphs as they appear, and input them after the timer has started.
The more glyphs you get right, the more AP you gain. Glyph hacking also nets more items than regular hacking.
Key Hacking
Section titled “Key Hacking”The second option you can see when you hold down the hacking button is a key hacking option. Prime allows you to gain keys even if you already have a key in your inventory by simply selecting this option.
No-Key Hacking
Section titled “No-Key Hacking”The third and final option allows you to hack the portal and obtain items but NO key.
This is helpful to save space by not having the keys clog up valuable inventory space.
Resonators
Section titled “Resonators”There are 8 levels of resonators, each slightly stronger than the last and each unlocked from Levels 1 to 8.
Hacking a portal gives gear around that portal’s level. Higher level portals will give better items!
Resonators are the primary in-game item, allowing you to capture and control portals and create links from the portal.
Agents can deploy 8 Level 1 Resonators, or 1 Level 8 Resonator. Note there are two exceptions to this:
- An agent can use a Virus to flip the portal, if the agent flips a portal to the Faction they belong to, their name will appear on every resonator.
- During special events, agents can deploy multiple resonators that exceed the standard output.
| Resonator Level | Coloration [* pre Ingress Prime] | Agent Limit | XM Provided to Portal | Recycle Value |
|---|---|---|---|---|
| Level 1 | 8 | 1000 XM | 20 XM | |
| Level 2 | 4 | 1500 XM | 40 XM | |
| Level 3 | 4 | 2000 XM | 60 XM | |
| Level 4 | 4 | 2500 XM | 80 XM | |
| Level 5 | 2 | 3000 XM | 100 XM | |
| Level 6 | 2 | 4000 XM | 120 XM | |
| Level 7 | 1 | 5000 XM | 140 XM | |
| Level 8 | 1 | 6000 XM | 160 XM |
Portal Level
Section titled “Portal Level”A single agent can only deploy enough resonators to make a portal Level 5. Having other agents add their resonators (known as bumping), will increase the portal’s level.
Placement
Section titled “Placement”While there is no wrong way to deploy a resonator, there is a strategic method to deploy them that results in a stronger portal.
Standing on top of a portal will result in what is commonly called a ‘campfired’ portal. All the resonators are close together at the base of the portal. Like rocks around a fire. Portals deployed like this are easier to destroy.
When deploying, ensure you position the portal on the very edge of your action radius to deploy resonators as far as possible from the portal.
Resonator Placement
Section titled “Resonator Placement”If you click on each resonator slot, you can choose where you place each resonator.
This allows you to place higher resonators away from the road where they might survive an attack.
Resonator Limitations
Section titled “Resonator Limitations”The level of the portal is determined by the level sum of the resonators divided by the number of resonators. Ie L5+L5+L4+L4+L3+L2+L2+L1=3.25 which will result in a level 3 portal.
It takes eight Level 8 resonators to make a Level 8 portal.
Each level resonator can only be placed by you a limited number of times.